Recent Tweets

Showing posts with label Flash. Show all posts

Top 5 Inexpensive Flash Accessories

By Daniel S


1. Gary Fong Puffer Pop-up Flash Diffuser
This small diffuser is an impressive piece of equipment, designed to diffuse the standard hot shoe flash that you will find on most DSLR and mirrorless cameras. It greatly improves the quality of the light. Traditionally, on board flash is harsh and too direct. Whilst the Puffer is not quite as good as a full size diffuser and flash, it definitely is the more compact option and a good addition to any camera bag.

The regular Puffer is designed to suit Canon, Nikon, Pentax, Olympus Four Thirds and Panasonic Lumix (hot shoe) cameras. We also sell a Konica Minolta/legacy Sony diffuser and a Micro Four Thirds diffuser.

A hot shoe is a requirement for this accessory. Feel free to contact us  to discuss compatibility with your camera.


2. Hähnel Combi TF Remote Control & Flash Trigger
This compact flash trigger allows you to get your flash off the camera. Each package consists of a transmitter and a receiver; one for the camera, the other for your flash unit. The Hahnel Combi TF allows for manual flash photography off camera, up to an impressive 100 metre range. Flash power is set on the flash unit while the camera settings determine the brightness of the light.

Off camera flash gives you more control over the look and style of your images, from soft flattering portrait set-ups to dramatic high contrast scenes. Off camera flash can give much more dynamic results.

The triggers come in a range of fittings for the main brands – Nikon; Canon, Pentax and Samsung; Olympus; Sony; and Panasonic.

Feel free to contact us to check on compatibility with your camera. Those wanting a more automated product may consider the Hahnel Viper (Canon only) or the Pocket Wizards.


3. Strobist Single Kit with 2m Light Stand & 100cm Umbrella
The Strobist Kit is an inexpensive lighting kit for use with an external flash; it can be used with a wireless flash or with triggers such as the Hahnel Combi units above.

The flash attaches to the top of the hot shoe umbrella mount allowing you to shoot through the umbrella, softening the light. This provides a portable flash solution that won’t break the bank.

The kit consists of:
• 1 x 3-section 200cm Mircopro LS-8003 Light Stand
• 1 x Flash Hot Shoe Umbrella Bracket
• 1 x 40" Two Layer Umbrella
• 1 x Soft Padded Carry Case

Those interested in more powerful options for the studio should check out some of our other studio lighting kits.


4. Gary Fong Lightsphere Collapsible Basic Kit
The Gary Fong Lightsphere kit is an impressive accessory that allows for diffusion of an external flash. The diffuser can be used on camera or off camera and softens the light dramatically - great for flattering portraits, lighting up backgrounds, shooting interior shots and filling light for landscapes.

The light diffusion is so good that it is not necessary to remove the flash from the camera. A must have for shooting enthusiasts and professionals who are on the move; a very popular choice for wedding photographers. The basic kit includes accessories to colourise the light and warm/balance the colour of the flash. As the diffuser is a big sphere there is the potential for light to dissipate out the back so the included chrome dome (silver piece) directs more of the light forward; this allows for more power which is great for large group portraits.

Here is a video from Gary Fong that goes into a little more detail about the Lightsphere.


There is also a Gary Fong Lightsphere Collapsible Pro Kit available if you would like a few more options to shape the light.


5. Sekonic Flashmate L-308S Light Meter
A light meter, whilst not a necessity in the digital world, is a very good accessory to have for flash photography. As many flash units and add-ons allow for automatic lighting, and digital images can be viewed instantly, many people have stopped using flash meters in their studio practice. Flash meters are a good idea though if you want to ensure you get the settings perfect and if you would prefer not to have to keep shooting test shots and checking the back of the camera. A light meter is indispensable for calculating ratios for multiple lights. Some of the more advanced meters can meter different lights individually and provide the ratios in the meter so you do not have to crunch the numbers yourself.

The Sekonic L-308S (pictured) is a great starting point that will accurately meter the power of your flash and provide the appropriate camera settings. There are many options with light meters and the rest of our range can be viewed in our light meters and add-ons section on our website.

If you need a hand with any of these flash accessories please call us on 1300 365 220 or email info@digitalcamerawarehouse.com.au.

What are your favourite flash accessories or techniques? Let us know in the comments below.

Introduction to Photo Exposure Terms - Part 1 - Shutter Speed

I recently presented at the Australian Art Show in Melbourne and Sydney, on a number of aspects of photography. The ‘Introduction to Photography Exposure Terms’ for beginners was popular, so I’ve turned it into a four part blog – Part 1: Shutter Speed, Part 2: Aperture, Part 3: ISO and Part 4: Exposure.
When you are a photography beginner, information is a great way to understand the basics and to help build some confidence. Of course, the best way to learn is to just get out there and get shooting!
What is a ‘stop’ of light?
A stop of light is either half or double the existing exposure.  So, when you add light (using the ‘+’ on the dial) you are making your photo brighter and when you reduce the light (using the ‘–‘ on the dial) you are making your photo darker.
If you under expose the image by one stop you are halving the amount of light that is hitting your sensor.  If you are over exposing by one stop then you are doubling the amount of light that is hitting your sensor. 
A number of cameras have a dial that has a +1, +2 and +3 with a corresponding -1, -2 and -3 on the same dial.  This is called the exposure compensation dial and allows the photographer to instantly over or under expose the photo. 
Command Dial
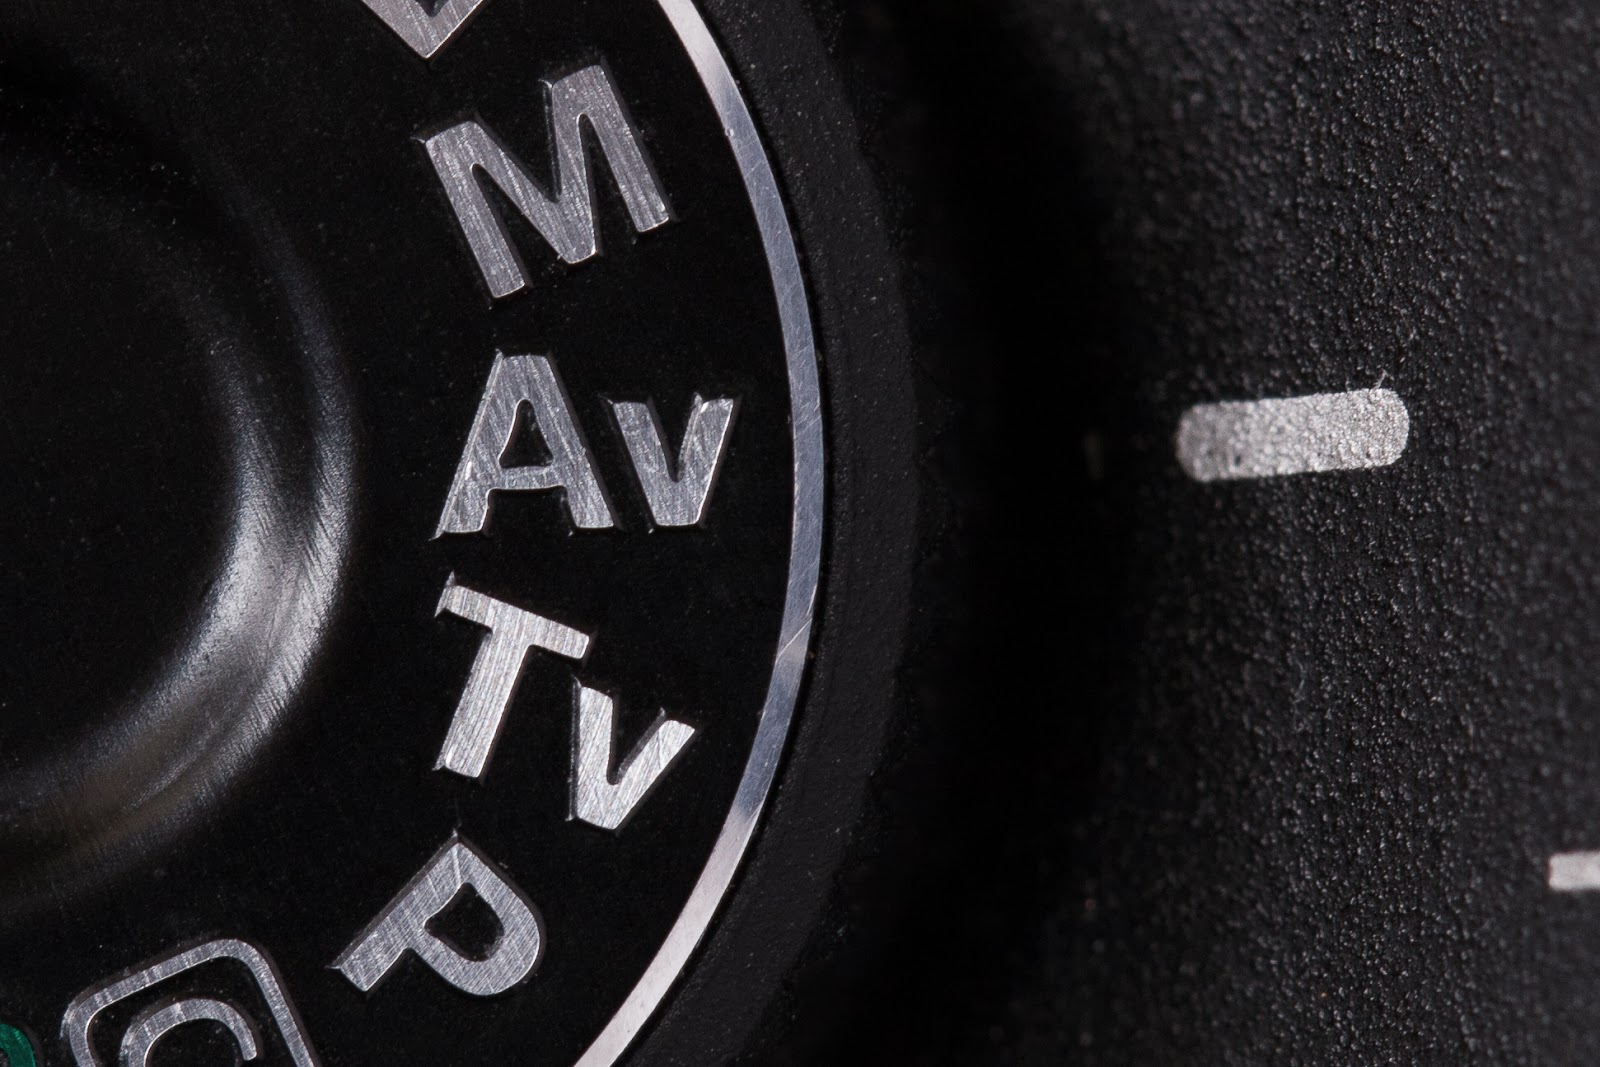
All DSLR cameras have a way of changing the three main exposure settings (shutter speed, aperture, ISO). The most common way is through a command dial which is found on one of the shoulders of the camera.  The photo here is from a standard command dial on a Canon camera. The letters stand for:

·      M – Full Manual control over shutter speed and aperture
·      AV – Control over the Aperture Value, in this mode the camera will automatically set the appropriate shutter speed to give the correct metered exposure based on whatever aperture you select
·      TV – This gives manual control over the Time Value (shutter speed) and the camera will again automatically select the correct aperture value depending on what shutter speed you select
·      P – This is the Program mode which automatically selects an aperture and shutter speed combination to give the correct exposure, but allows you to override this combination if you wish
 
Shutter Speed
Shutter speed refers to the length of time your shutter exposes the sensor of your digital camera.  The longer the shutter speed is, the longer your sensor is exposed.  Changing your shutter speed will do a couple of things:
·      Lengthening the shutter speed will let in more light
·      Shortening the shutter speed will let in less light
·      The slower the shutter speed, the more likely that any movement from the subject or the camera will show up in the image (and sometimes you may want this…)
·      If you have an extremely short shutter speed you can freeze movement
Shutter speed is generally written as ‘1/125’ (which means 125th of a second) but on a camera dial it will usually be shown as ‘125’.

Examples

The photo above was shot at 1/8000th of a second using high speed flash. It shows how a quick exposure can freeze movement and allow you to see details that you would otherwise miss. The shutter was too fast for any background detail to appear.
 

This photo is shot with the exact same set up but at a shutter speed of 1/20th of a second.  The results show the subject is blurred and has lost all fine detail and the photo no longer looks focused.  The background has detail because the shutter speed has stayed open long enough for the grass to appear. 

Next week, Part 2 of our ‘Introduction to Photography Exposure Terms’ will be on aperture.

Shooting Haunted Houses and Kids (for Halloween)

We like to turn any event, celebration, gathering, holiday and weekend into a reason to take photos. And with Halloween coming up and the potential for lots of ghouly and gruesome night shots, we thought some hints and tips would be useful.

Capturing special effects and lighting

When photographing houses to capture special effects and lighting, long exposure photography is a great option. You will be able to capture the decorations and special Halloween lighting on houses.
In terms of equipment, use a sturdy tripod to keep your camera steady and your photos sharp - some exposures can be as long as 30 seconds which is impossible to hand hold.  
To get the best results, shoot with a moderately low ISO in the range of 100-400, to keep sensor noise to a minimum.  This will give a much cleaner result to your shot.  
Shoot in RAW to give yourself the ability to recover detail in bright and dark areas in your post processing flow.  When taking the photo use a cable release, either a wired or wireless one; this will prevent camera shake if you accidentally move the camera when pressing the shutter button at the start of your exposure.  
Experiment with your exposure to get the best result, overexpose by a couple of stops to see what the results looks like. No need to follow the rules, just have fun!

Capturing the creepy kids!

It’s not just decorations and lighting you will want to capture. Taking photos of your kids in costume can be great fun.  Using some off-camera flash with gels can add awesome light to your image.  A good trick is to fire the flash from behind your child-zombie who is facing toward the camera. This will give a backlit silhouette effect that looks great.  Try with any colour gel (a green or orange one looks great).  
 

Placing the flash in different places around your kids to change the effect and using a slower shutter (approximately 1/8 of a second) will also capture any lights or decorations in the background.  This is great for ambience and to help set the scene.  For this type of shoot you will need a DSLR, an off-camera flash, flash trigger and some gels.  If you hand hold the camera, be sure to increase your ISO to capture the background lights.  
This should be a fun shoot. Experiment with anything you can think of - there are no limits to what you can try!

Macro Photography – A Good Setup and Patience is all you need


Have you ever wanted to attempt macro photography but weren’t sure where to begin?
If so, read on for some useful tips.


Macro photography is any type of close up photography that magnifies a subject to life size or greater.  This is called the magnification ratio and is seen on lenses like this: 1:1. A proper macro lens will reproduce at this ratio and some, like the Canon MP-E 65  will actually magnify up to 5 times larger than life size.  This would magnify a grain of rice to fill the frame of a full size DSLR sensor!

Successful macro photography can be a challenge and will certainly take practice and a lot of trial and error but when you get that perfect shot it will all be worth it.

Firstly, obtain a proper (1:1) macro lens or extension tube.  A dedicated macro lens  is important as a normal lens will not focus close enough to get any sort of detail in very small subjects.  Keep in mind that a macro lens can be used for general photography as well.  A cheaper alternative are the use of extension tubes (not to be confused with extenders) which increase the distance between the lens and the image sensor to allow you to focus at closer distances.  Either of these will ensure a good start in macro photography.

Manual focus is the name of the game.  A static object like a flower (assuming there is no wind around) or a shell is easier to focus on, simply because the only movement variable is you.  If you are using a good tripod, preferably with a macro slider, then it simply requires a little patience to obtain a sharp image.  Additionally, the use of a relatively small aperture such as f11 or f16 will provide more depth of field in the image.  Keep an eye on your shutter speed and use a remote release or the camera’s built in self timer mode to eliminate camera shake.  If your camera has a mirror lock up mode then this function would also be good to utilize.

Pre-focus is another great option. If you are trying to photograph insects a good tip is to set yourself up in an area where your target is likely to land or pass through and pre-focus on that spot.  A wireless remote release is a very helpful here as it will allow you to step away from the camera and begin firing as soon as your subject lands in the target zone. You may get a lot of unusable shots, but on the flip side you may also capture that perfect shot.

When thinking about lighting, the closer something is to the front of the lens generally means the difficulty to light it sufficiently increases.  In some cases your lens may actually cast an unwanted shadow on your subject.  Macro flash attachments (ring flashes) are very useful as they sit at the end of your lens to illuminate the subject.  You can also get constant light LED attachments that are not as powerful as a ring flash but are cheaper.  If outside, the sun can provide enough lighting for some subjects and you can use a diffuser to soften the light or to bounce light into the shadows.  

Every scenario is different so initially there may be an element of trial and error but hey, that's the fun of it!


Portrait Photography: A Beginner's Guide

This blog post will guide you through all the necessary steps to recreate successful studio lighting using Canon flashguns that can be set up in almost any situation, though the same setup may be achieved with other brands in a similar fashion.  Shooting in a studio or similar scenario is an excellent way to learn how light can affect your photos.  These lessons can be used in any photographic situation, be it a highly controlled studio setup or shooting with natural light in an uncontrolled environment.


DCW's Portrait Photography Demo at Sydney Morning Herald's Photo1440 Workshop


The following are some general rules for lighting -

1) The larger the light source when compared to the subject, the softer the quality of the light that falls on the subject. This is because the larger light source wraps around the subject, softening the edge of shadows.  As the light source gets smaller you’ll notice the shadow edges become more defined.

Moving a large light source closer to the subject also has the effect of softening the shadows while moving the light away makes the edge of the shadow sharper and more defined.        

If you diffuse a light source, the light scatters and results in a softened quality as the diffuser essentially becomes the light source. For example - On a bright, sunny day the shadows are strongly defined as the light source is far away i.e. the sun. If passing clouds then block the sun, the light will soften as it becomes diffused by the clouds, thus simultaneously drawing the light source closer as the clouds now become the source.  So you can look at it two ways - the hard light source is now diffused OR the light source is now very large and close.

2) Bouncing a hard light source off a wall onto your subject effectively creates a larger light source.

This occurs by making the wall a light source.  As the wall is much larger than the size of the flash, the light also becomes a lot softer.  This requires a greater power output from your flash as some light is lost from the wall and the light also has to travel further to reach the subject.  Be aware of the colour of the wall as the light from your flash will change to whatever colour the wall is i.e. red wall equals red light, green wall equals green light, etc.

3) Front lighting diminishes texture, side lighting (from any direction) emphasizes texture and rear lighting highlights the shape of the subject.

The direction of a light source has a big affect on the appearance of texture in an image. Lighting from the side will increase the appearance of texture on surfaces while light hitting the subject from the camera position will flatten the texture in an image. To achieve this, the light should be un-diffused as a diffused light source will soften the shadows and may even eliminate the texture. Light from behind the subject highlights the shape of the subject; a prime example of this would be a silhouette.

Some general portrait photography tips -

1) A messy background will interfere with a good portrait. That is unless the background helps to tell the story of the portrait.  For example - a violinist may have a portrait taken with their violin in the background to tell the viewer more about the subject.  If the background doesn’t assist the story then blur it out as much as you can with a large aperture or if possible, get rid of any distracting elements completely.  There’s nothing flattering about seeing images of people with trees sprouting from their heads.  

2) Have the lighting set up and the camera ready to go before your subject arrives so that they won’t have to wait for you upon arrival.
3) In portrait photography the primary area of interest and focus is almost always the eyes.  As humans, that’s where we look first. Because of this it’s critical that the eyes are in focus.

​4) The direction of a subject’s eyes is also very important in a portrait. Having the subject return the gaze of the photographer can give the viewer a sense of connection with the subject.  An alternative is to have your subject looking at someone or something within the shot, which sets up a story in the image.  The most obvious one is a mother with her child looking at each other.  If you imagine that same photo with the mother looking directly at the camera and not her baby, the image immediately shifts to a completely different vibe.
​5) Portraits are most commonly taken at the same eye level as the subject. Playing around with the angle can give a different perspective to the portrait. For example, shooting down on your subject from above, or up at them from ground level can change the viewer’s perceptions of the inherent power of the subject.

​6) Firing a number of shots at a time can either give you a series of images that work together or it can help you achieve one image that is natural. This is useful when you’re photographing somebody engaged in an activity or when working with kids.
Lighting Setup


The following is a list of steps to recreate our portrait set up.  In this example we used 3 Canon 600EX RT flashes, 2 60x60 Mircopro soft boxes and a Honl light shaper (for the hair light).

Step One.

Flash 1 is set up with the soft box at a 45 degree angle to the subject.  The light in this photo is softer than a direct flash due to the soft box and off-centre position which creates a nice modelling effect upon our subject.  This light is referred to as the key light or main light as it is responsible for the primary lighting effect in the shot.  At this point the line between the lit part and the shadow is nice and gradual but the shadow area is quite dark. I set this flash at +1/3 exposure compensation to make the image a bit brighter.

Step Two.

To lighten this area we require a second light from the opposite side of the subject.  This light needs to be less powerful than the key light so it doesn't eliminate the modelling effect the shadow creates.  I set the power of this light to half of the power of the key light and use the same soft box on it.  This will lighten the shadows to even out the contrast while still keeping the shadow areas present but to a lesser degree.  I set this light at -2/3 exposure compensation.

Step Three.

Now we need to add a bit more light to the hair of our subject to create a bit of shape.  For this I put a Honhl flash bender onto the third flash.  I’ve put it into the shape of a snoot, which is simply a tube made to funnel light into a specific area of a photograph.  In this case I want the light to fall onto the hair of our subject to highlight it and give some definition and shape to the subject. To do this I simply aim the snoot towards the subject directly from the other side of the key light.  Also make sure you have a bit of height so you are shooting the light at more of a downward angle.  This has created a highlight effect that helps the image to pop and adds a bit more depth.  This light is set to +/-0 exposure compensation to make the highlights stand out when compared to the second flash.

So there you have it. A simple, quick technique for studio lighting to get you started.  Off-camera flash is a great way to begin learning about how different angles and quality of light can change the look of the subject.  Once you are confident in using flash then it is easier to know how the quality of existing light will look in your photos.  Using flash is also a really good way to train yourself to understand how different lighting can affect the photo you take and also trains you to identify lighting conditions and ways you can manipulate it to obtain a good result. 

Documentary and Photojournalist Tips and Techniques


Shooting in a documentary or journalistic style is a really good way to produce a strong and coherent body of work on a subject you are passionate about.  Unfortunately it’s not always easy to get the results you want.  We have a few preparation tips for events or assignments which you wish to photograph as a story. This could range from your kids first soccer match to a harder hitting subject.  Whatever the story is, there are some key things that will enable you to be capture-ready when that perfect moment occurs.  To get a head start on telling your story, read on....
 
The most important thing is to be prepared with batteries fully charged (both primary and spares), testing them in-camera to ensure all necessary gear is in good working order. Triple-check your camera settings before you begin to confirm everything is a-ok. Don’t forget to also obtain permission to shoot the event if required.  

Have a pre-determined idea of the story you wish to tell and think about the type of shots needed to tell that story effectively. An example might be a wide-angle shot of a factory to set the stage, a few portraits of factory workers and some candid photos of their day-to-day experiences.  Remember to be patient as you may not always get the shot on day one. The photographic style you choose can say a lot about the subject and the aim should be to always show the reality of the subject’s situation. The challenge is to capture the humanity in the scene and this only comes from practice, patience and experience.

Keep in mind you may need to do some homework before you start.  Check with the organisers (if applicable) of the event to see if there are any restricted subjects or areas and if you need a permit to shoot in a specific location. If it's a public event held on public property then you should generally be fine to simply show up and shoot.  If you do have a meeting with anyone in the lead up to an event make sure you are punctual and act in a professional manner.  This will give you credibility and shows that you have respect for them as well.

Some factors to consider during your project is – ‘How will you present the finished folio?’ ‘Will it be in colour or black and white (or both)?’ ‘Are you going to print them or will it only be viewable online?’ Also take note of locations, dates, times and names as you shoot because the photos will need to be given context with a few words attached to each image.  People need to know what they are seeing and their significance as it pertains to the overall portfolio.  Documentary photos rarely speak for themselves.

The equipment required is very personal and also dependent on the story type.  For some stories, being unobtrusive and ‘under-the-radar’ is essential so therefore using a compact but high-quality camera is important.  Some suggestions would be the Fujifilm X100s , Sony RX1, Leica X2 or Olympus OM-D-E5These are all compact cameras with serious sensors and high quality optics yet they are hard to notice and whisper quiet when shooting with them.

If there is no need for a low-profile then feel free to equip yourself with what you think will be needed and that you can deal with carrying around all-day.  For me it would be the Canon 16-35, 24-70 f2.8 and 70-200 f 2.8 (or equivalent lengths in your chosen brand) or a combination of two of these depending on the situation.  Also, two strobes may come in handy with two Gorillapods to hold them in position should an opportunity arise to set up some posed portraits. A small tripod with an adapter can work as a light stand or a tripod when required.

Check out these links to get inspired by some talented photojournalists.

*Please note that the following links are to external sites and may contain photos of a mature nature so reader discretion is advised.

Verve Photo - photos and links to some of the best photographers in this field.

The New York Times Lens blog - excellent photography with each entry telling a story from The New York Times.

Tatiana Cardeal - a mixture of travel and photojournalist work.

Sanjit Das - some great reportage stories and great photography.

Once you're feeling inspired why not give it a go and enter the Sydney Morning Herald Photos1440 Challenge!  Great prizes are on offer for the best of the best including a Canon 5D Mk3 Pro kit (includes a 24-70 f2.8 II Lens), an internship with The Sydney Morning Herald and prizes from Digital Camera Warehouse!  The challenge is 'Capturing the minutes of the day' and the winning entrants will be displayed as part of The Sydney Morning Herald exhibition - Photos1440 capturing the minutes of the day.  The exhibition is proudly presented by Canon Australia.

Good luck and don't forget to share with us your results on our Facebook page or right here on this blog.


Valentine's Day Photo Tips


With Valentine's Day fast approaching, here are ten quick tips to assist you in capturing the special moments with your loved one this February 14th.

1. Avoid Flash Photography

Where possible, preserving the natural ambience of a scene such as candle lighting will produce an authentic capture of the mood and setting.

2. Candid Shooting

While posed shots are good, capturing candid moments will provide you with a lasting memory of that spontaneous action.


3. Tripod and Timer Use
When taking ‘selfies’ with your loved one, consider using a tripod in conjunction with your camera’s timer-countdown function to ensure camera shake is minimal. Additionally, utilizing the camera’s burst-mode to take multiple exposures not only paves the way for spontaneity, but will also increase your chances of a perfect shot in case of blinking.  

4. Close-ups

Zoom-in to capture various emotions of the day including that priceless smile or a special gift exchange moment.

5. Silhouettes

Silhouettes are a powerful method of capturing romantic scenes with a dramatic vibe.

6. Props

Utilize sentimental items and/or Valentine’s Day related props to give your photograph a fun and playful edge that encapsulates the subject’s personality.

7. Depth of Field Control

Draw attention to the desired subject(s) by exploring depth-of-field settings. A beautifully soft out-of-focus background adds visual value to the occasion.

8. Be Mindful of Your Surroundings

Keep an eye on your background and surroundings to avoid any objects that may cause distraction.

9. Objects and Elements

Special objects and elements such as a table setting, gorgeous scenery or a present are fantastic for showcasing unique highlights of the day.
10. Digital Darkroom        

The post-photography process can be a fun stage of creative exploration via your favourite photo-editing software suite. Digital filters and effects can add various levels of class or change the scene dynamics to suit your desired style.
Until next time folks, enjoy the month ahead and may it be filled with cherished memories!


Studio Lighting Tips: Three-Point Lighting Setup


If the photography bug has bitten you hard and you want to start doing some serious shooting, you might want to think about kitting yourself out with some lighting gear. If you’ve never used your own external lighting setups before, it can be a learning curve but the rewards are rich. See below for some great tips on getting better photos with controlled lighting:

1   Okay, first things first. Great lighting can be let down by poor composition and posing, especially when it comes to portraits. Take the time to set the scene properly. Watch for shrugged shoulders, stiffness, slouching and striking features hidden by poor positioning. You can also make use of props and accessories, and be sure to pay attention the background of your photos – it is better to enhance than detract from your subject.

It can be a little overwhelming playing director and having to guide your subject so specifically, but the results can be stunning. Try and breath some natural life into what can be seen as quite a rigid situation – tell a joke to get natural expressions of happiness and laughter, or give a totally left-field direction and you might just strike a gold pose. 
Just remember to keep snapping and try different things.


     There are many lighting setups, and once you learn the ropes you will be an unstoppable lighting machine that will have many ideas on what works for you. Portraits tend to be shot with a three-point lighting setup, and that is what we will focus on.

The Three Points:

1.       Main (or Key) Light:

This is your main lighting source, and is the primary point of illumination of your subject.  You can use a speedlite [ADD LINK] for this or a studio lighting kit [ADD LINK], sometimes referred to as flashes or strobes.

If you are using a speedlite, get it off your camera! On-camera flash can cause flat lighting, whereas you can use it to much greater effect off the camera with a flash trigger.

By using an off-camera light source you can use shadows and highlights to enhance bone structure, skin tone, eyes and other features of your subject’s face that you may not normally achieve.

No matter how good you get, with lighting comes testing and repositioning until it looks right. This can take an indeterminate amount of time! Be patient.

2.       Fill Light
 
This light will help soften harsh shadows caused by the main light. This will improve overall results and give your shots a more professional edge, though it is optional and if you are starting out and only have one light you can try reflectors to soften hard edges.

In terms of positioning, if the main light is to one side of the camera, the fill light is typically placed on the opposite side.

3.       Background Light

As you might have guessed, this one lights the background.  It will light up whatever happens to be in the background, which is essential if you have gone the whole hog and put together a set with props and the whole shebang.

The light is placed typically behind the subject, and is pointed at the background. Again, this is an option depending on your exact shooting situation, but if you don’t have a background light you can get away with using a dark backdrop in its place.


And there you go! As with anything in photography, it will take practice and you will be sure to have a ball while improving your skills. You won’t believe the difference some controlled lighting can make, so do feel free to check out our extensive range online, or pop into one of our stores to ask our knowledgeable staff.

Linky linky: