Recent Tweets

Introduction to Photography Exposure Terms – Part 2: Aperture

By Marc B
Last week we introduced beginners to shutter speed. This week (in Part 2 of the Introduction to Photography Exposure Terms), we’re introducing aperture.  
Using these two settings effectively, along with ISO settings, are key factors in creating the type and style of photograph you want. Think about the outcome you want and adjust your settings. Experimentation is the best way to learn what works, and most importantly, what works for you. So start shooting!

Aperture

There are two reasons to adjust aperture settings. These are, to control the amount of light in your photographs, and creating your desired depth of field in each shot.
Light
The aperture or ‘f stop’ refers to the opening inside a lens that controls how much light passes through the lens to the sensor.  In most lenses this is variable so the photographer can control the light with a high degree of accuracy, choosing if they want a brighter or darker photograph.
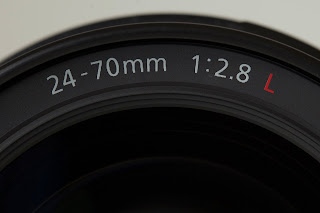
The widest aperture of a lens is usually written on the front the lens, and is usually shown as, 1:2.8. This means that the largest aperture on the lens is f2.8. 
On some zoom lenses it may be expressed as something similar to, 1:3.5-4.6. This means that at the widest focal length of the lens the largest aperture is f3.5 and when you zoom all the way in, the largest aperture will be f4.6.  The different representation of the aperture on a zoom lens is because the lens itself absorbs light as it is extended or ‘zoomed in’.
Depth of Field
Controlling the area of apparent sharpness in an image is referred to as the depth-of-field (dof) in an image.  A large aperture (which is achieved by selecting a small number ie. f2.4) will give a shallow depth of field to an image, and a small aperture (which is achieved by selecting a large number ie. f22) will give a deep depth of field.
In the graphic below the relative sizes of the apertures are shown.  At f22 the image will have apparent sharpness from front to back.  At f1.8 the image will have a narrow band of sharpness, or a shallow depth of field.

Examples
The first image is shot with a large aperture of f2.8 and you can see how the depth of field drops off quickly and the image loses sharpness.
 
The second image was shot with a small aperture of f22 and the depth of field is now very deep and there is detail a lot further back into the image.


Keep in mind that if you want the entire image to be sharp you need to use a small aperture (choose a large ‘f stop’ number).  If you want to achieve a shallow depth of field, use a large aperture, such as f2.4 or f1.8.
Experiment and have fun!
Next week, Part 3 of our ‘Introduction to Photography Exposure Terms’ will be on ISO.

Top 5 Inexpensive Flash Accessories

By Daniel S


1. Gary Fong Puffer Pop-up Flash Diffuser
This small diffuser is an impressive piece of equipment, designed to diffuse the standard hot shoe flash that you will find on most DSLR and mirrorless cameras. It greatly improves the quality of the light. Traditionally, on board flash is harsh and too direct. Whilst the Puffer is not quite as good as a full size diffuser and flash, it definitely is the more compact option and a good addition to any camera bag.

The regular Puffer is designed to suit Canon, Nikon, Pentax, Olympus Four Thirds and Panasonic Lumix (hot shoe) cameras. We also sell a Konica Minolta/legacy Sony diffuser and a Micro Four Thirds diffuser.

A hot shoe is a requirement for this accessory. Feel free to contact us  to discuss compatibility with your camera.


2. Hähnel Combi TF Remote Control & Flash Trigger
This compact flash trigger allows you to get your flash off the camera. Each package consists of a transmitter and a receiver; one for the camera, the other for your flash unit. The Hahnel Combi TF allows for manual flash photography off camera, up to an impressive 100 metre range. Flash power is set on the flash unit while the camera settings determine the brightness of the light.

Off camera flash gives you more control over the look and style of your images, from soft flattering portrait set-ups to dramatic high contrast scenes. Off camera flash can give much more dynamic results.

The triggers come in a range of fittings for the main brands – Nikon; Canon, Pentax and Samsung; Olympus; Sony; and Panasonic.

Feel free to contact us to check on compatibility with your camera. Those wanting a more automated product may consider the Hahnel Viper (Canon only) or the Pocket Wizards.


3. Strobist Single Kit with 2m Light Stand & 100cm Umbrella
The Strobist Kit is an inexpensive lighting kit for use with an external flash; it can be used with a wireless flash or with triggers such as the Hahnel Combi units above.

The flash attaches to the top of the hot shoe umbrella mount allowing you to shoot through the umbrella, softening the light. This provides a portable flash solution that won’t break the bank.

The kit consists of:
• 1 x 3-section 200cm Mircopro LS-8003 Light Stand
• 1 x Flash Hot Shoe Umbrella Bracket
• 1 x 40" Two Layer Umbrella
• 1 x Soft Padded Carry Case

Those interested in more powerful options for the studio should check out some of our other studio lighting kits.


4. Gary Fong Lightsphere Collapsible Basic Kit
The Gary Fong Lightsphere kit is an impressive accessory that allows for diffusion of an external flash. The diffuser can be used on camera or off camera and softens the light dramatically - great for flattering portraits, lighting up backgrounds, shooting interior shots and filling light for landscapes.

The light diffusion is so good that it is not necessary to remove the flash from the camera. A must have for shooting enthusiasts and professionals who are on the move; a very popular choice for wedding photographers. The basic kit includes accessories to colourise the light and warm/balance the colour of the flash. As the diffuser is a big sphere there is the potential for light to dissipate out the back so the included chrome dome (silver piece) directs more of the light forward; this allows for more power which is great for large group portraits.

Here is a video from Gary Fong that goes into a little more detail about the Lightsphere.


There is also a Gary Fong Lightsphere Collapsible Pro Kit available if you would like a few more options to shape the light.


5. Sekonic Flashmate L-308S Light Meter
A light meter, whilst not a necessity in the digital world, is a very good accessory to have for flash photography. As many flash units and add-ons allow for automatic lighting, and digital images can be viewed instantly, many people have stopped using flash meters in their studio practice. Flash meters are a good idea though if you want to ensure you get the settings perfect and if you would prefer not to have to keep shooting test shots and checking the back of the camera. A light meter is indispensable for calculating ratios for multiple lights. Some of the more advanced meters can meter different lights individually and provide the ratios in the meter so you do not have to crunch the numbers yourself.

The Sekonic L-308S (pictured) is a great starting point that will accurately meter the power of your flash and provide the appropriate camera settings. There are many options with light meters and the rest of our range can be viewed in our light meters and add-ons section on our website.

If you need a hand with any of these flash accessories please call us on 1300 365 220 or email info@digitalcamerawarehouse.com.au.

What are your favourite flash accessories or techniques? Let us know in the comments below.

Introduction to Photo Exposure Terms - Part 1 - Shutter Speed

I recently presented at the Australian Art Show in Melbourne and Sydney, on a number of aspects of photography. The ‘Introduction to Photography Exposure Terms’ for beginners was popular, so I’ve turned it into a four part blog – Part 1: Shutter Speed, Part 2: Aperture, Part 3: ISO and Part 4: Exposure.
When you are a photography beginner, information is a great way to understand the basics and to help build some confidence. Of course, the best way to learn is to just get out there and get shooting!
What is a ‘stop’ of light?
A stop of light is either half or double the existing exposure.  So, when you add light (using the ‘+’ on the dial) you are making your photo brighter and when you reduce the light (using the ‘–‘ on the dial) you are making your photo darker.
If you under expose the image by one stop you are halving the amount of light that is hitting your sensor.  If you are over exposing by one stop then you are doubling the amount of light that is hitting your sensor. 
A number of cameras have a dial that has a +1, +2 and +3 with a corresponding -1, -2 and -3 on the same dial.  This is called the exposure compensation dial and allows the photographer to instantly over or under expose the photo. 
Command Dial
All DSLR cameras have a way of changing the three main exposure settings (shutter speed, aperture, ISO). The most common way is through a command dial which is found on one of the shoulders of the camera.  The photo here is from a standard command dial on a Canon camera. The letters stand for:

·      M – Full Manual control over shutter speed and aperture
·      AV – Control over the Aperture Value, in this mode the camera will automatically set the appropriate shutter speed to give the correct metered exposure based on whatever aperture you select
·      TV – This gives manual control over the Time Value (shutter speed) and the camera will again automatically select the correct aperture value depending on what shutter speed you select
·      P – This is the Program mode which automatically selects an aperture and shutter speed combination to give the correct exposure, but allows you to override this combination if you wish
 
Shutter Speed
Shutter speed refers to the length of time your shutter exposes the sensor of your digital camera.  The longer the shutter speed is, the longer your sensor is exposed.  Changing your shutter speed will do a couple of things:
·      Lengthening the shutter speed will let in more light
·      Shortening the shutter speed will let in less light
·      The slower the shutter speed, the more likely that any movement from the subject or the camera will show up in the image (and sometimes you may want this…)
·      If you have an extremely short shutter speed you can freeze movement
Shutter speed is generally written as ‘1/125’ (which means 125th of a second) but on a camera dial it will usually be shown as ‘125’.

Examples

The photo above was shot at 1/8000th of a second using high speed flash. It shows how a quick exposure can freeze movement and allow you to see details that you would otherwise miss. The shutter was too fast for any background detail to appear.
 

This photo is shot with the exact same set up but at a shutter speed of 1/20th of a second.  The results show the subject is blurred and has lost all fine detail and the photo no longer looks focused.  The background has detail because the shutter speed has stayed open long enough for the grass to appear. 

Next week, Part 2 of our ‘Introduction to Photography Exposure Terms’ will be on aperture.

Six Reasons to Upgrade to a DSLR

Compact digital cameras are pretty impressive these days and everyone needs a small and lightweight camera to take on outings, to family events, concerts and for everyday photography. Compact cameras do have their limitations though and there will be times when you want more control over your creativity or just a little more power.
For these situations a DSLR (Digital Single Lens Reflex) camera may just be the thing to take your photography above and beyond. Here are some reasons why you should upgrade to a DSLR camera.
 
                
1.         Low Light Performance

DSLRs have a much larger sensor than the majority of compact cameras. The bigger sensors have better light sensitivity and are less prone to noise (digital graininess or colour spots) and therefore create better images in low light. The advanced sensor technology and reduction in noise allow for usable images at much higher ISOs (higher light sensitivity).  Paired with a lens that lets in more light (low aperture), you will be amazed by some of the low light situations that you can shoot in.

2.         Interchangeable Lenses

With a DSLR comes versatility. Because the lenses are interchangeable, the one camera can be used in multiple shooting situations. A wide angle lens has a larger angle of view and can be good for landscapes whilst a telephoto zoom may be your go-to lens for portraiture. With a variety of lenses, one camera can shoot in many different situations with a myriad of effects.

3.         Better Portraits

DSLRs can give better results for portraiture for a number of reasons; their larger sensors provide a more shallow depth of field, blurring the background and separating your subject from the background. This is what creates that pop or the more 3-dimensional effect. There are a series of lenses available that are considered to be ‘portrait lenses’. These lenses generally range between 85mm and 135mm, although there are no hard and fast rules. The lenses in this style can be more flattering as that viewpoint will compress or flatten the features of the face somewhat in comparison to a wide lens that will distort the features.

4.         Speed

Whilst there are exceptions to this in the world of compact cameras, the majority of DSLRs are faster than compact cameras. The overall layout on a DSLR is geared to quick operation with the most used functions being easily accessible at your fingertips. The assortment of dials and buttons fit in with the ergonomic design of the DSLR for quick and easy manual control.

DSLR Lenses use a faster method of focus that can track moving subjects accurately. Combine this with a fast frame rate (quick successive shots) and the DSLR is the obvious choice for sports or actions shooters.
 
As you climb higher up the DSLR ladder you will see higher speeds and designs more suited to the speed conscious shooter.

5.         Control

Even with all of today’s bells and whistles, cameras are still built on a few main functions; aperture, shutter speed, focus and ISO. In essence it is the combination of these that will determine how your photographs will look.  Recent camera advancements make it possible to never have to consider any manual settings at all but manual modes are where the fun lies.

Although daunting initially, being able to creatively control your camera opens a world of shooting possibilities and improves your photography. The beauty of digital is that you can experiment and learn on the fly, reviewing images as you shoot them and seeing what works and what does not.

6.         Large Range of Accessories

Flash units, filters, remotes, bags, cases, cables, microphones, software and more. DSLRs have the largest number of cool accessories by far and these can be used to control the camera, enhance the images as you take them, or in post-production. The possibilities are unlimited and once you get a DSLR you will be on the lookout for the next interesting accessory to boost your kit.
While a DSLR is not essential for good photography it can allow you to get a step closer to achieving your artistic vision. A good DSLR camera will enable you to take control. 
If the idea of a larger camera is off-putting but you still want some extra control and interchangeable lenses, check out the more compact CSC cameras. These cameras, while not quite at the level of a DSLR, are advancing at a fast rate and offer many of the advantages above.  There are shooters out there getting some amazing results with high end compacts, rangefinder styled cameras and CSC cameras. In the end it comes down to personal preference and your requirements; as the saying goes – ‘the best camera is the one that's with you’.
You may find that your photography demands a variety of different cameras for different situation but the DSLR is still the most versatile option for innovative images.
What are your thoughts? Has using a DSLR enhanced your photography? Are you a compact camera boffin? Is CSC your camera of choice? Let us know in the comments below.