Recent Tweets

Q&A with Belle Kringas


We recently met with Belle Kringas to collaborate on a photo/video shoot for the Sony a7R IV. We loved her youthful enthusiasm for inspiring other creatives and encouraging them to push their creative boundaries.

With this in mind, we decided to delve a little deeper to try and find the source of her passion, and determination.

How long have you been shooting? 

I have been shooting for 3 years. Starting in photography and now finding passions in art direction, videography and cinematography. 

Photographer @bellekringas | Models: Mona @shhhhhimona and Melissa @me.lissac
Tell us a bit about your work? 

My work is always focused on telling stories i wish to see more of, whether that’s highlighting a message, emotion or the people around me. I hope to motivate others to take action and trust in their own personal missions, as I am in mine simultaneously. 

 Photographer @bellekringas | Model: Kydra @kydrasaur
Where do you create most of your work? 

All of my work is created “on the road” regardless of shooting or editing, as there is never a set location I come back to. I could travel to 4 locations in a day for a photoshoot, or travel 3 hours for a scenic view, so I try to find creative ways to carry my gear, handle props and manage my editing schedule. When it comes to editing, I travel with my laptop everywhere. Some days that means camping out at a cafe, working from my phone to plan out ideas or meeting other photographers at their places for editing sessions. 

Photographer @bellekringas | Model: Rachel @rachelsyllaa
What are 5 essential bits of gear in your “studio”? 

The 5 essentials when i am out shooting are my tripod for any timelapses or cinemagraphs, a camera flash, or handheld video light, a microphone, my 16-35mm Sony GM lens and a cushioned pouch for all my spare batteries and SD cards

Photographer @bellekringas | Model Kymberlee @kymberleestreet
What inspires you?

What inspires me changes every day. There was a period of time where I created an entire visual story in the form of a digital novel, or watching YouTubers / influencers living out their daily lives yet having such a huge impact on people. The biggest inspirations always come back to people that are being true to themselves even when it’s difficult or vulnerable. The more people open up about mental illness, sexuality, feminism, race, culture and share it, the more I learn about myself. 

Photographer @bellekringas | Models: Mona @shhhhhimona and Melissa @me.lissac
Do you have any tips or advice for aspiring creatives who are starting out?

The best advice I could give is to remember we are all rookies and all experts at something. Recognise where you lack, and the skills you possess so you do not equate your value to how much you may fail/succeed. Utilise all the resources we have to learn from, whether that is learning After Effects through YouTube tutorials, or helping out fellow creatives on projects you are keen to get involved in. Researching gear is a massive help as well, if you are wanting to get started as a photographer or a videographer, the gear your favourite creatives use may not necessarily fit your lifestyle and uses. Ask yourself why you love the field you want to get started in, and find like minded individuals on and offline that can guide you or grow as you are.


Photographer @bellekringas | Model: Anonymous

The Worlds Most Popular One Light Setup

What does the world of modern photography have to do with a Dutch painter from the 17th century?

Rembrandt Lighting. That’s what.

Rembrandt lighting is named after Rembrandt Harmenszoon van Rijn. Yes, that Rembrandt.

Generally considered one of the greatest story tellers in the history of art, he was a draughtsman, painter and print maker whose work possessed an exceptional ability to render people in their various moods using the technique of light and shade.
A master in the use of light and shadow.
The Rembrandt lighting setup is characterised by one side of the subjects’ face being lit, with the other side in shadow. The shadow cast by the nose meets the shadow created on the cheek to form a triangle of light under in between. This play between light and shade is why Rembrandt lighting is used when you want to add drama to your image.
The Rembrandt Triangle
Today Rembrandt lighting is arguably the most common one light setup used by portrait photographers on a budget. Its dramatic results make it an easy technique to add to your creative catalogue.

Can you spot the 'Rembrandt Triangle'?
A reflector placed at a 45° angle on the opposite side of the flash can help to soften the shadows on the darker side of your subjects face for a more subtle effect.
Add a reflector on the other side to lift the shadows.
Ready to up your portrait photography? Shop our range of flash, light modifiers and studio accessories. Still have questions? Why not come to a Photology workshop?

DCW Photo Q&A - Wedding Photography with Ashley K


We caught up with Melbourne based wedding photographer, Ashley K to talk about her portrait and wedding work and to get some useful tips for aspiring photographers.  Ashley is a passionate, down-to-earth award-winning wedding photographer with nine years of experience.

Ashley has a genuine respect for traditional photographic conventions, but also loves to push the envelope and really put her creativity to work. She describes herself as a hopeless perfectionist and can happily spend hours in front of the computer tweaking little details to make masterpieces for her clients.

How long have you been shooting?
I have been shooting weddings for over 8 years now. My main passion is in wedding photography. I love the unpredictability of shooting weddings. Rocking up to new locations and shooting in various lighting conditions.


Tell us a bit about your work.
Primarily I am a wedding photographer, however, I have my own studio and during the week I photograph new-born’s and families.

I like to think my work is very inspired by light. I love the playful use of light in my wedding work. I also advertise myself as a destination wedding photographer and have been fortunate to shoot weddings all over the world.


Just last week I shot a wedding in Fiji and this month I am off to Europe to shoot a wedding in Tuscany. Travelling is another passion of mine, so I am grateful to be able to do both.

Where do you create most of your work?
Being a wedding photographer, I am all over really. Most of my local jobs are shot in Victoria's winery region, the Yarra Valley but as I mentioned, I am so lucky to have shot weddings all over the country and overseas.


Once I am finished shooting, I have a big passion for editing so all the final magic is created in my office at home. I don't like editing from a laptop. I like a large screen to be able to really see the image up close and put the finishing touches to create beautiful artwork for my clients.

What are 5 essential bits of gear in your “studio”?
Apart from the obvious being a camera, essential bits of gear would be:
High-speed Memory Cards:  I like to be able to shoot fast so having high-speed memory cards is really important to me, so that I don't miss moments especially during un-staged events like the ceremony or reception of a wedding. 

Lights and Flashes: These are so important to me especially if I want to create something interesting. I love natural lighting, but I also love shooting indoors and architecture so for me I want to be able to be diverse with my shooting style. Having lights just gives me the flexibility to shoot wherever I want.

Lenses: My main two lenses are a 50mm lens and a wide-angle lens. I love my 50mm for beautiful portraits but I also love having a wide lens like a 16-35mm so I am able to get shots of beautiful landscapes or beautiful buildings. I like to call my wide shots epic shots and they usually feature as a double page spread in my client's wedding albums. 


Hard Drives: I don't know if this is classified as gear, but I would imagine it would be one of the most important things to have as a photographer. I like to have 3 hard drives going at one time. I always back up my client's work x3 I think its really important as a wedding photographer to ensure you take all the right steps to secure your client's photos. I don't think I could live with myself if I was unable to deliver my client's wedding photos. I hear a lot of horror stories online about clients not receiving their photos back because their photographers lost their images or the hard drive failed. 

Back-up Camera: Another important piece of gear which should be obvious, is a second camera body. I had a shutter failure on one of my cameras many years ago and I was about 2 hours out of Melbourne, the failure happened just before the ceremony.
Luckily, I had a second camera with me to shoot the rest of the day but I couldn't imagine what I would have done if I didn't have that second camera. Very important as an event or wedding photographer that you invest in a second body.

What inspires you?
Travelling inspires me, I love shooting weddings in new countries and experiencing new cultures and traditions. I like to shoot 3-4 destination weddings a year.


Last week in Fiji was amazing, they had traditional fire dancers and food at their wedding. But not only that I got to shoot in one of the best sunsets I have photographed in a long time. It's good to broaden your horizons and try shooting in different countries.

Do you have any tips or advice for aspiring creatives who are starting out?
One of the biggest tips I learned many years ago when I attended a workshop was to always follow the light and become obsessed with light. To always see the light before the location. After that workshop, I walked away with the most valuable lesson and became obsessed with light.


I think a lot of wedding photographers these days forget how important light is and don't prioritize it enough in their wedding work.  A lot of people often like to shoot in natural lighting where the clouds are out and it is nice and soft and diffused and don't get me wrong I do too, but that is a very easy way of shooting and then all our images look the same.


To stand out amongst the rest I think it’s important to really familiarise yourself with all sorts of lighting and use light to your advantage to create something different.


A big thank you to Ashley for her insightful answers. Check out more of Ashley’s work on her website at www.ashleykweddings.com and her Instagram @ashleykweddingphotographer

The Essentials For a Home Studio


For many, a home photo studio is the first step in establishing ourselves as a professional photographer. It represents the first controlled space where we can better understand light and gain an appreciation for how it can affect an image and how it can be employed to create a certain mood or optical effect.

A home studio can be a safe space where we are free to experiment with the relationship between lighting, the camera, and the subject. It’s an oasis where we can play with creating an image without the constraints of a creative brief, client budget or deadlines. Its where our photographic style can be defined, refined and perfected.

Sounds great right? So what kind of gear do you need to set one up on a budget? Here are our studio essentials:

Flash

Blink and you'll miss it!
Of course, the most important bit of gear you will need is a flash to properly illuminate your subject. Some factors to consider when choosing a flash are power, TTL metering and portability. These will determine the versatility and convenience of your setup.

A more powerful flash will allow you to shoot larger objects or scenes, or overpower the sun if you're shooting outdoors. TTL Metering can add convenience to your shooting by automatically analysing your camera settings then determining the exact flash power required for a perfect exposure. 

Portability is important if you think you will want to use flash in an outdoor or on-location context. Think fashion photo shoots, wedding photography, portrait photography etc.  

Speedlights run on batteries and are portable and lightweight. Studio strobes are generally for more professional indoor only shooters and can require plug-in AC power.

Flash Trigger

The flash doesn't always have to be attached to your camera!
The next bit of gear we'd suggest is a wireless flash trigger. You can achieve some great things with the flash mounted on your camera, but where you can really flex your creative muscle is when you're able to position your lighting independent to where your camera is shooting.

A flash trigger also opens up the possibility of using multiple lights to further control which parts of your subject you want to highlight, or use multiple lights to illuminate a larger surface area or multiple subjects. 

Light Stand

Light stands are just simple tripods for your lighting equipment.
The third piece of the puzzle is a light stand. Think of light stands as tripods for your lighting equipment. They enable you to precisely position your lights where you need quickly and easily.
Light stands may also be a requirement for the final piece to the puzzle:

Light Modifiers

Creating interesting effects with 2 different coloured gels.
Light modifiers. This is where you can really get carried away. There is a huge selection of modifiers to choose from and experimenting with what each one does and how it impacts your final image is part of the fun.

Broadly speaking, modifiers are split into two categories. Speedlight or On-flash modifiers and studio modifiers.

Speedlight modifiers attach directly to your flash while studio modifiers are generally larger and will require a light-stand to hold and position them.

Reflectors, soft boxes, coloured gels, bounce cards, snoots, grids, beauty dishes and more can be added to your shooting kit broaden your studio capabilities.

You will be amazed what you can achieve with these 4 additions to your photography kit.

Did we inspire you to find out more? Come into store and have a chat, or give us a call and speak with our expert staff.

Shoot for the Stars: 5 Reasons You Should Try Astrophotography


Number 1: Enjoy some Peace and Quiet

How’s the Serenity? To get great images of the night sky and the Milky Way it’s best to get out of the city to avoid light pollution. The perfect excuse for a road trip or a weekend away. Make sure you pack a sturdy tripod though, because capturing the stars means using a super-slow shutter speed.


Using shutter speeds of 20-30 seconds or even longer gived you plenty of time to relax, contemplate, and enjoy the peace and quiet while waiting for your exposure to finish. Why not bring a hot drink along to warm you up while you wait. Just remember to focus before pressing the shutter or you’ll be waiting a long time to get a blurry shot.

Number 2: Experiment with Composition

Even the most popular locations tend to have fewer people at night, so there’s more room for you to explore different compositions. 


Spend some time thinking and planning what to feature in the foreground of your star or milky way shot to make your astro photography really stand out.


Number 3. Bring Your Own Light Show

You don’t have to worry about sunlight or harsh shadows at night. So why not make your own lighting effects with LED’s or flashlights


The moon can also be used as a light source for your scene as well, but beware of it drowning out the stars if it’s full.


Number 4: Enjoy Some Quiet Reflection

Capturing the night sky with the milky way in all its glory on a clear night is an incredibly experience, and one thing to make it look even better is something as simple as a bit of water.


Look out for puddles and still bodies of water, because shooting with a low perspective from next to the surface can some create incredible mirrored reflection shots.


Number 5: Unleash your Creativity

Your camera can see way more than your eyes can. Combine that ability with the power of a telescope and you might be able to catch a glimpse into the wondrous light beyond our atmosphere.


You can experiment with different techniques to capture more unique shots. Combining several shots together can create stunning star trails.


Or try zooming your lens while your camera is capturing a long exposure for an interesting and unique look.


We're running some great workshops on Astro this month at Digital Camera Warehouse. Check out our Photography Workshops to find out more.

Everything You Need to Start a Vlog


What’s a “vlog” you say? It’s a portmanteau of “video blog” and if you’ve ever been to YouTube, you’ve definitely seen one. It’s a bit of a household term these days and they do cover some pretty informative, insightful stuff!

From tutorials, to reviews, it’s become quite normal to check the vlogs of our favourite internet personalities before we start, do, or buy something.

If you’ve been thinking about starting a vlog yourself, but aren’t sure what you need to begin, we’ve done some legwork and created a few kits that’ll make it easier to get the cogs turning.

Level 1 – Beginner

DCW Vlog Kit

DCW Vlogger Kit

Ideal for Social Media & Podcasts
Suits most Android and iPhones
Also compatible with most Compact DSLR and Mirrorless
Great for Time-Lapse, Vlogs, Selfies & More
Enhance your Creative Potential
Kit Includes Mini Tripod, Smartphone Mount, Lavalier Microphone

If you’re new to the idea of using a camera entirely, you might prefer to get started with your smartphone. That’ll give you a taste of what to expect as well as a good foundation upon which your cool new hobby can grow.

Our own vlogger kit includes a mini tripod and lavalier microphone. It’s pretty much all the basics to get you going right out of the box, just add your own Smartphone. And when you do get over using your phone, no worries, this kit works just fine with cameras as well.

The kit's small size makes it very portable. If you’re planning a more ‘out and about’ style vlog, this will fit easily into your bag and, as an added bonus, doesn’t look super-obvious when set-up on a table at your favourite café.

Nice-to-Have Additions
Despite being a capable beginner kit already, as you progress, you’ll find little things that could make your life easier. Something like a small LED light might be a good early addition if you find yourself struggling with lighting in different locations.

Suggestions: The LitraTorch or the Aputure Amaran AL-M9.


Level 2 – Intermediate 


 Canon M6 Vlogging

Canon EOS M6 Vlogger Kit

24.2 Megapixel APS-C Sensor
Dual Pixel AF Focusing System
Full HD Video Recording
3-inch Flip-Up Touch Screen
Wi-Fi & Bluetooth Connectivity
Compact, Mirrorless Design
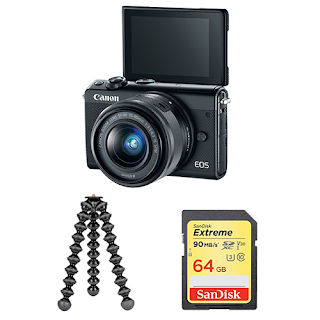
Includes 15-45mm Lens & 64GB Sandisk Extreme Pro
Includes Joby Gorillapod 1K

The Canon EOS M6 kit is an excellent step into the realm of vlogging cameras. It comes with a versatile 15-45mm zoom lens that should help you capture dynamic angles and close-ups.

It shoots Full HD video, has super-accurate autofocus, and a flip-up touch screen so you can see yourself while you record. This is a real benefit, as you can easily make sure you’re still in frame and not drifting off to the side somewhere.

The included 64gb memory card has enough capacity to record your newest episode, while the Joby Gorillapod gives you the flexibility to position your camera very creatively.

Nice-to-Have Additions
A dedicated microphone would knock this kit into a whole new tier of awesome. If you’re going to be alone in a small space, you can get away with a little on-camera mic. If you’ll be working in larger areas or chatting with other people, a set of lavalier mics will significantly improve your sound quality and vocal clarity.

Suggestions: For an on-camera mic, the Rode VideoMic GO. For a lavalier mic, the Rode SmartLav+.

Level 3 – Advanced

 Sony Vlog Kit

Sony a6400 Vlogging Kit

24.2 Megapixel Exmor CMOS Sensor
4K Video Recording with No Time Limit
Real-Time Tracking and Eye AF
11fps Continuous Shooting
180° Flip-Up Screen and XGA OLED Viewfinder
Built-In WiFi and NFC Connectivity
Dust and Moisture Resistant Alloy Body
Includes Sony 16-50mm Lens + Zoom Mic + Vlog Grip/Mini Tripod

Getting more advanced, the Sony a6400 vlogging kit is kind of like a perfect storm. It’s pocket-sized performance that’s accessorised and raring to go.

Sony's a6400 is a very capable camera with a boat-load of features that'll make vlogging life super-easy, like the real-time eye tracking autofocus. This keeps your eyes in focus, even if you’re moving around the frame. You can see all this on the handy flip-up screen, to.

It also shoots 4K which really lets you step up your video game in terms of smoothness and clarity. Bonus, viewers tend to appreciate it too. The kit includes an on-camera shotgun microphone and a mini tripod that’s perfect for interviews or shooting a selfie-style video.

When closed, the mini tripod acts as a comfy little hand grip that features convenient controls like start/stop recording, still image capture, and zoom. This makes it really easy to start new clips or change your framing without having to touch the actual camera.

Nice-to-Have Additions
While this is more than enough to get started, there’s still other goodies that might end up on your shopping list. For starters, a gimbal would go a long way. Not only does the longer handle make it easier to hold the camera, gimbals offer incredible stabilisation and oftentimes they have accessory attachment points to help keep the weight off your camera.

Another addition that would make a big difference is an LED light or two. Especially if you’re a more active ‘on-location’ vlogger, you can never be certain what the lighting situation will be at your destination. Best to be ready for anything!

Suggestions: For gimbals, see the Feiyu AK4000 and the Zhiyun WEEBILL Lab.
For LED lighting options, check out the Rotolight RL48 Ring Light, or the Aputure Amaran AL-H198.

Bonus Level – Professional

 Nikon Z6 Vlog Kit

Nikon Z6 Vlogging Kit

24.5 Megapixel Full Frame BSI CMOS Sensor
Vibration Reduction Sensor Stabilisation
273 Autofocus Points
4K Ultra HD Video Recording
Robust Weather Sealed Body
Wi-Fi and Bluetooth Connectivity
Includes 24-70mm f/4 Lens + FTZ Lens Adapter
Includes Atomos Ninja V, Zhiyun Weebill Lab Gimbal, Rode VideoMic Pro+, Nikon EN-EL15B Battery, ATF 7-inch Articulating Arm

Check out that arsenal! We are not playing around here. The Nikon Z6 vlogging kit is real deal. The Holy Grail. This rig is for pro-level users looking for the answer to all their vlogging needs. (And then some.)

The Z6 comes with a 24-70mm lens, a favourite for its versatility and perfect for stills and video. The kit also includes the ultra-flexible Zhiyun Weebil Lab gimbal for reliable stability that’s easy to balance and hold, no matter how the camera is mounted.

Another feature item is the Atomos Ninja V 5.2-inch external touchscreen monitor which provides a bright, super-sharp display that’s perfect for checking framing and footage. It can be mounted to the gimbal directly using the handy articulating arm, letting you position it as needed for a clear view.

Every accessory in this kit has been carefully chosen to make sure it’s a literal all-in-one solution for professionals, businesses, or enthusiasts ready for a serious upgrade in production capabilities.


The kits listed above are a bit of aspirational food for thought. There’s no sort of ‘hard and fast’ requirements for vlogging gear, just because there’s so many factors to consider. Location, style, subject matter, frequency, the list goes on.

In reality, the best way to figure out what kind of gear you need is by just getting started with what you have. As you progress and get used to recording regularly, you’ll start to notice which bits and pieces you could add or upgrade to make your workflow smoother, whether that’s a new camera, a better tripod, or lighting.

When it comes down to it, the most important thing to do before hitting record is to decide what you’re going to talk about. And that’s a whole other topic in its own right.

If you’re thinking of getting started and need a little more inspiration, check out our dedicated Vlogging Kit Category!

It’s a good starting point, at least for gear, whether you’re looking for a whole kit or just accessory ideas to complement your current set-up.

Don’t be afraid to reach out to us for more help, either! Find us online on Facebook and Instagram, or give us call!

The Olympus OM-D E-M1X: Is Bigger Better?


Olympus have made a big move with the release of their brand-new flagship camera the OM-D E-M1X and to celebrate they invited us to the Hunter Valley to test out how the camera handled extreme fast-paced action.

Our first stop was a dirt track with a couple of rally cars that flew around covering us in a fine layer of dust. We weren't afraid to get our hands or the camera dirty so we grabbed a 12-100mm lens to test out the new autofocus tracking system.

Using AI, the camera can detect and track 3 different types of subjects: cars and motorcycles, planes and helicopters, as well as trains. The algorithm starts tracking subjects before you even press the shutter and when you half-press, the camera springs to life, locking onto your subject and relentlessly holding focus throughout the frame.

Once the drivers were satisfied that we were covered in enough dirt we moved on to our next challenge, shooting a stunt plane pilot performing a series of elaborate aerial manoeuvres using the 12-100mm lens and the 300mm telephoto lens.

You can see how accurately the autofocus system performed from the video below, which is constructed entirely from JPEGS straight out of the camera, shot in the 18fps burst mode.


Let’s be real for a second though and ask the question that is on everyone’s lips. Why release a bigger camera while other manufacturers are focusing on making cameras that are smaller and smaller?

Does size matter?

With the E-M1X Olympus are making the statement that in some situations smaller is not necessarily better. The grip has been precisely designed to allow for seamless switching between landscape and portrait orientations while at the same time greatly improving the balance of the system when shooting with long telephoto lenses.

But it isn’t just that that the camera is more ergonomic and comfortable to use, it also packed with power, boasting dual image processors and a heat dissipating venting tube. The grip also includes dual batteries that effectively double the shooting time of the camera.

Olympus have taken the release of the E-M1X is an opportunity to flex their muscles and show off what they're capable of. They’re confident that once photographers get their hands on the new camera, they will be converted.

Who is the OM-D E-M1X made for?

Firstly, The E-M1X is not aimed the same shooters the most recent batch of mirrorless cameras are designed for. It is instead aimed squarely at the high end of the professional market and if you think about it that makes sense.

Olympus already produce some of the most compact and portable mirrorless systems with models like the E-M5 Mark II and the E-M10 Mark III, so why not focus on making a camera that instead combines the weight savings of mirrorless with the performance and ergonomics that are an industry standard for professionals.

And that is exactly who Olympus have designed the E-M1X for. The wedding photographers, photo journalists, portrait, nature and sports shooters.  

In short, if you pick up a camera to make a living, they designed this camera for you. So why are they so positive that this new camera will appeal to professionals?

Reliability

It’s built like a tank, with improved weather sealing that surpasses the IPX1 standard and a super durable shutter unit rated for 400,000 actuations. We shot in super dusty conditions on a hot Australian summers day and tested the splash proof construction and the E-M1X didn't miss a beat.

Image Quality

Quality is key. It doesn’t matter how in focus your shot is, if you don’t have excellent image quality nothing else really matters. As professionals, clients expect you to be able to deliver the absolute best. The E-M1X delivers image quality and then some by introducing the new handheld pixel shift mode.

Handheld Pixel Shift

The camera uses the in-body stabilisation system to move the sensor several times, capturing images at different positions and then merging the shots together to produce an ultra-high-resolution final image.
Because this method takes several photos it means that even the slightest movement can ruin the shot, requiring that the camera be set up on a tripod. That is until now.
The Olympus EM-1X can produce handheld pixel shifted ultra-high-resolution images with a whopping 50-megapixels and it can do that at shutter speeds as slow as 1/60 of a second.

5-Axis Sync IS

Olympus were one of the first manufacturers to incorporate in-body stabilisation or IBIS into their line-up and they’ve been refining the technology for years. Their latest innovation, the EM-1X offers an impressive 7 and a half stops of image stabilisation when paired with their 12-100mm f/4 lens, or 7 stops with other Olympus glass.

Just to provide some context of what that means, 7 stops is equivalent to increasing your ISO from 100 to 12,800 or shooting with a shutter speed of a 1/4 of a second rather than 1/500th of a second. So, if you can picture the difference between those settings would have on your image and then add another half a stop that’s the advantage the system can offer.

While we were at the Hunter Valley, we got the chance to speak to Olympus Australia visionaries; Nick Ghionis and Michael Hurren to find out their thoughts about the new camera and the Olympus system in general.


From the time we were given the cameras to the time we reluctantly handed them back, the performance of the E-M1X was nothing short of incredible.

Overall the high-speed capture ability of up to 18 fps with AF/AE tracking was super impressive, but for us the big stand-out features were the industry leading 7.5-stops of image stabilisation and ‘Intelligent Subject Detection’ autofocus.

Find out more about the camera by following the link below.

Top 5 Gift Ideas Series: Part 7 - DSLR and Mirrorless Cameras

Top 5 Interchangeable Lens Cameras Ideas This Christmas


An interchangeable lens camera such as a DSLR or Mirrorless represents the cream of the crop in the world of camera technology. Regardless of whether you’re a beginner looking to step up from your smartphone or compact, or an experienced shooter seeking the right tool to break through your creative boundaries, this Christmas we’ve got suggestions across all photographic levels. 

The Canon EOS Twin Lens Kit represents the perfect platform for students and those new to photography. Its 24 Megapixel sensor and dual pixel AF technology ensure it’s capable at both stills and video. The twin lenses ensure zoom coverage up to 250mm, perfect for that next overseas holiday or family vacation – Save $235. Limited Time only. 

  • 24 Megapixel CMOS Sensor 
  • Dual Pixel CMOS AF + DIGIC 7 Processor 
  • 3.0” Clear View Vari-Angle LCD Touch Screen 
  • Full HD Video Recording 
  • Guided Display Mode 
  • Wi-Fi + Bluetooth + NFC Connectivity 
  • Compact and Lightweight Design 
  • Includes Canon 18-55mm + 55-250mm IS STM Lenses 

2- Olympus OM-D E-M10 III Twin Lens Kit

The Olympus E-M10 III twin kit is the perfect travelling companion. Its lightweight retro styled design is a delicate fusion of fashion and function. With a 5-axis in-body image stabiliser and 4K video recording capabilities, it can handle a broad range of shooting scenarios, while maintaining a discreet profile – Includes $150 Visa Giftcard. Ending Soon. 

  • 16.3 Megapixel Live MOS Sensor 
  • Fast TruPic VIII Image Processor 
  • 5-Axis In-Body Image Stabilisation 
  • 4K Video Recording 
  • High Speed 121-Point Autofocus 
  • 3-Inch Tilting Touchscreen 
  • Built-In WiFi for Wireless Camera Control 
  • Includes M.Zuiko 14-42mm III EZ + 40-150mm R Lens 

3- Canon EOS R Body with Control Ring Mount Adapter

The Canon EOS R was one of the most highly anticipated releases of 2018. Combining a compact, lightweight mirrorless body with their Dual Pixel autofocus technology, plus excellent backwards compatibility with their EF range of lenses has ensured early success for this popular release. 


30.3 Megapixel Full Frame Mirrorless Camera
DIGIC8 Image Processor
4K Video Recording at 30fps
Dual Pixel AF with 5655 AF Points
Dual Pixel RAW Image File Compatibility
Top Mount LCD Panel
Intuitive Multi-Function Touch Bar
Built-in Wi-Fi & Bluetooth Connectivity
Includes Canon Lens Control Ring Mount Adapter - EF-EOSR

The Sony A7 III ticked enough boxes for enough people for it to win the coveted EISA 2018-2019 Camera Of The Year award. So popular was its debut that there was a global shortage while manufacturing worked to keep up with demand. With a 24 Megapixel sensor, 5-axis image stabilisation, 4K video recording and an amazing 693 autofocus points, it’s easy to see why. We’ve secured limited stock for Christmas, so get in quick to avoid disappointment. 

24.2 Megapixel Back-Illuminated Full Frame CMOS Sensor
5-Axis In-Body Image Stabilisation
2.36 Million-dot OLED EVF and Tilt Touchscreen
10 fps Burst Shooting with Silent or Mechanical Shutter
693 Phase Detection AF Points & Eye AF
Dust/Moisture Resistant Body Construction
4K HDR Video & Full HD 120p
High Capacity Battery, Joystick Control and Dual SD Slots


5- Fujifilm GFX 50R + GF 32-64mm f/4 Lens

The Fujifilm GFX 50R is revolutionising the medium format category. The 50R crams a massive 51.4 Megapixel medium format sensor into a rangefinder style body, enticing photographers who would not traditionally consider medium format because of its size to make the switch. To sweeten the deal this Christmas, we’re offering a $1000 discount with all GFX 50R Camera and Lens combos, plus claim up to $750 Cashback from Fujifilm via redemption. 

  • 51.4 Megapixel Medium Format CMOS Sensor 
  • X-Processor Pro Image Processor 
  • 14-Bit RAW with 14 Stops of Dynamic Range 
  • Rangefinder-style 3.69M OLED EVF 
  • Lightweight Mirrorless System Design 
  • Weather Resistant Body 
  • 2-Direction Tilting 2.36M-Dot Rear LCD 
  • Dual UHS-II SD Card Slots & Bluetooth Connectivity